

Meta Title: Salary Slip Generator in Excel VBA | Auto Generate PDF Salary Slips
Meta Description: Learn how to build a Salary Slip Generator in Excel VBA that automatically creates PDF salary slips for every employee in just one click. Free VBA code included.
Salary Slip Generator in Excel VBA – Save Hours of Manual Work
Imagine this.
It’s 11:30 AM, and your manager walks over and says:
“Can you generate salary slips for all employees and send them as PDFs before lunch?”
If you have 10 employees, it might not sound difficult.
But what if you have 100, 300, or even 1,000 employees?
Opening every salary slip, changing the employee name, checking the details, exporting it as a PDF, and repeating the same process again and again is not only boring—it also increases the chances of making mistakes.
That’s exactly why I created this Salary Slip Generator in Excel using VBA.
With a single click, Excel automatically creates individual salary slip PDFs for every employee and saves them in your selected folder.
No repetitive work.
No copy-paste.
No manual PDF exports.
In this article, I’ll show you exactly how this automation works. At the end of this guide, you can simply add your own VBA code and start generating salary slips in minutes.
What Is a Salary Slip Generator?
A Salary Slip Generator is an automated Excel solution that creates salary slips for every employee using a master employee database.
Instead of preparing each salary slip manually, the VBA macro:
- Reads employee information from the master sheet
- Updates the salary slip template automatically
- Exports each salary slip as an individual PDF
- Repeats the process for every employee
- Saves all PDFs automatically
The entire process happens in just a few seconds.
Why Use Excel VBA for Salary Slip Generation?
Most HR teams still spend hours creating salary slips every month.
Using Excel VBA eliminates repetitive work and makes the entire process much faster.
Some of the biggest advantages include:
- One-click salary slip generation
- Automatic PDF creation
- No manual copy-paste
- Reduced human errors
- Works completely offline
- Easy to customize
- No monthly software subscription
If your salary data is already maintained in Excel, VBA is one of the simplest automation solutions available.
Workbook Structure
The workbook is very simple.
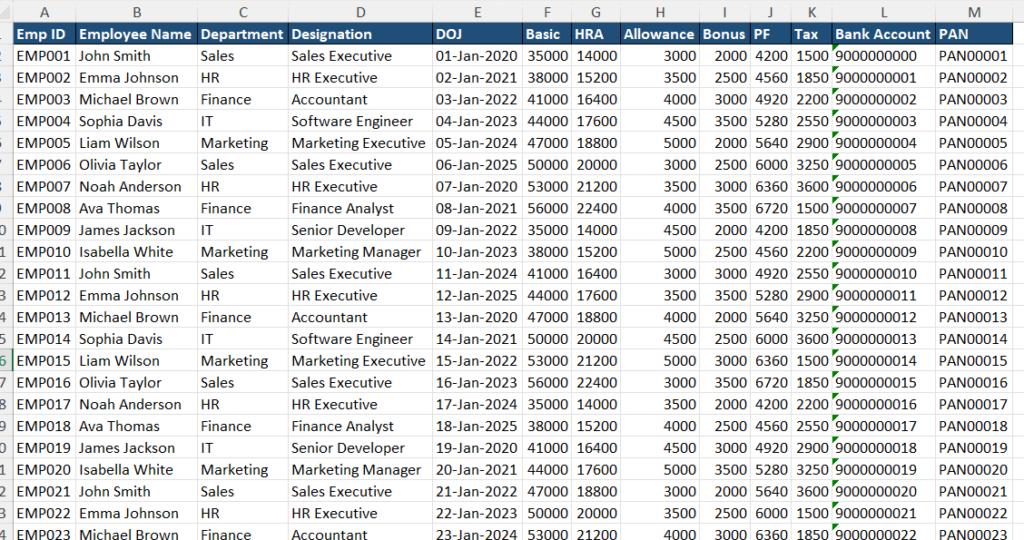
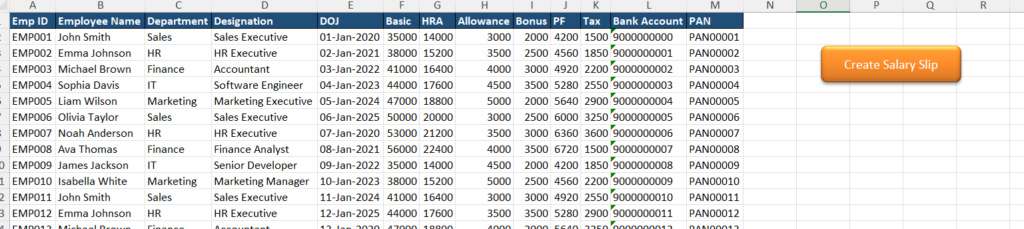
Sheet 1 – Employee Master
This sheet contains all employee information such as:
- Employee Name
- Employee ID
- Department
- Designation
- Basic Salary
- Allowances
- Deductions
- Net Salary
- Bank Details
- PAN Number
- PF Number
Every employee occupies one row.
This becomes the source data for the automation.
Sheet 2 – Salary Slip Template
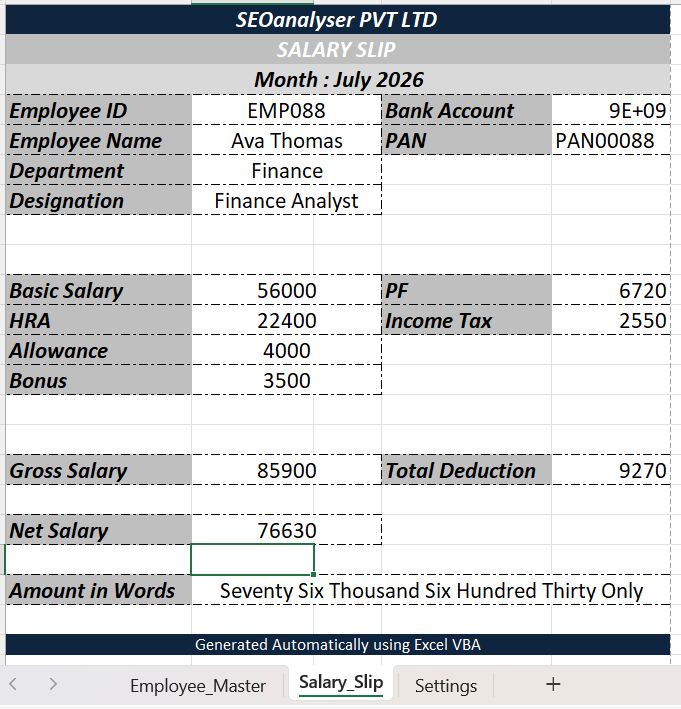
The second worksheet contains the salary slip design.
Every field in the template is linked to the employee master data.
When VBA selects a different employee, the salary slip updates automatically.
Once updated, VBA immediately exports the worksheet as a PDF before moving to the next employee.
This process continues until every employee’s salary slip has been generated.
How the Salary Slip Generator Works
The automation follows a simple workflow.
Step 1
Open the Excel workbook.
Step 2
Go to the Developer tab.
Step 3
Open the Visual Basic Editor.
Step 4
Insert the required VBA modules.
Step 5
Module-1
Option Explicit

Sub GenerateSalarySlips()

    Dim wsMaster As Worksheet
    Dim wsSlip As Worksheet

    Dim LastRow As Long
    Dim i As Long

    Dim GrossSalary As Double
    Dim TotalDeduction As Double
    Dim NetSalary As Double

    Dim FolderPath As String
    Dim FileName As String

    Set wsMaster = Worksheets("Employee_Master")
    Set wsSlip = Worksheets("Salary_Slip")

    FolderPath = ThisWorkbook.Path & "\Salary Slips\"

    If Dir(FolderPath, vbDirectory) = "" Then
        MkDir FolderPath
    End If

    Application.ScreenUpdating = False
    Application.EnableEvents = False
    Application.DisplayAlerts = False
    Application.Calculation = xlCalculationManual

    LastRow = wsMaster.Cells(wsMaster.Rows.Count, "A").End(xlUp).Row

    For i = 2 To LastRow

        Application.StatusBar = "Generating Salary Slip " & (i - 1) & _
        " of " & (LastRow - 1)

        '=========================
        'Employee Details
        '=========================

        wsSlip.Range("B4").Value = wsMaster.Cells(i, 1).Value
        wsSlip.Range("B5").Value = wsMaster.Cells(i, 2).Value
        wsSlip.Range("B6").Value = wsMaster.Cells(i, 3).Value
        wsSlip.Range("B7").Value = wsMaster.Cells(i, 4).Value

        wsSlip.Range("E4").Value = wsMaster.Cells(i, 12).Value
        wsSlip.Range("E5").Value = wsMaster.Cells(i, 13).Value

        '=========================
        'Salary
        '=========================

        wsSlip.Range("B10").Value = wsMaster.Cells(i, 6).Value
        wsSlip.Range("B11").Value = wsMaster.Cells(i, 7).Value
        wsSlip.Range("B12").Value = wsMaster.Cells(i, 8).Value
        wsSlip.Range("B13").Value = wsMaster.Cells(i, 9).Value

        wsSlip.Range("E10").Value = wsMaster.Cells(i, 10).Value
        wsSlip.Range("E11").Value = wsMaster.Cells(i, 11).Value

        GrossSalary = _
            wsMaster.Cells(i, 6).Value + _
            wsMaster.Cells(i, 7).Value + _
            wsMaster.Cells(i, 8).Value + _
            wsMaster.Cells(i, 9).Value

        TotalDeduction = _
            wsMaster.Cells(i, 10).Value + _
            wsMaster.Cells(i, 11).Value

        NetSalary = GrossSalary - TotalDeduction

        wsSlip.Range("B16").Value = GrossSalary
        wsSlip.Range("E16").Value = TotalDeduction
        wsSlip.Range("B18").Value = NetSalary

        'Amount in Words
        wsSlip.Range("B20").Value = SpellNumber(NetSalary)

        'PDF Name
        FileName = FolderPath & _
        wsMaster.Cells(i, 1).Value & "_" & _
        wsMaster.Cells(i, 2).Value & "_July2026.pdf"

        wsSlip.ExportAsFixedFormat _
            Type:=xlTypePDF, _
            FileName:=FileName, _
            Quality:=xlQualityStandard

    Next i

    Application.StatusBar = False
    Application.ScreenUpdating = True
    Application.EnableEvents = True
    Application.DisplayAlerts = True
    Application.Calculation = xlCalculationAutomatic

    MsgBox LastRow - 1 & " Salary Slips Generated Successfully."

End Sub
Module-2
Function NumberToWords(ByVal MyNumber As Double) As String

    Dim Ones

    Ones = Array("", "One", "Two", "Three", "Four", "Five", _
    "Six", "Seven", "Eight", "Nine", "Ten", "Eleven", _
    "Twelve", "Thirteen", "Fourteen", "Fifteen", _
    "Sixteen", "Seventeen", "Eighteen", "Nineteen")

    Dim Tens

    Tens = Array("", "", "Twenty", "Thirty", "Forty", _
    "Fifty", "Sixty", "Seventy", "Eighty", "Ninety")

    Dim n As Long

    n = CLng(MyNumber)

    If n < 20 Then

        NumberToWords = Ones(n)

    ElseIf n < 100 Then

        NumberToWords = Tens(n \ 10)

        If n Mod 10 > 0 Then

            NumberToWords = NumberToWords & " " & Ones(n Mod 10)

        End If

    ElseIf n < 1000 Then

        NumberToWords = Ones(n \ 100) & _
        " Hundred " & _
        NumberToWords(n Mod 100)

    Else

        NumberToWords = Format(n, "#,##0")

    End If

End Function
Module-3
Function SpellNumber(ByVal MyNumber)

    Dim Temp
    Dim DecimalPlace, Count
    Dim Place(9) As String

    Place(2) = " Thousand "
    Place(3) = " Million "
    Place(4) = " Billion "
    Place(5) = " Trillion "

    MyNumber = Trim(Str(MyNumber))

    DecimalPlace = InStr(MyNumber, ".")

    If DecimalPlace > 0 Then
        MyNumber = Left(MyNumber, DecimalPlace - 1)
    End If

    Count = 1

    Do While MyNumber <> ""

        Temp = GetHundreds(Right(MyNumber, 3))

        If Temp <> "" Then
            SpellNumber = Temp & Place(Count) & SpellNumber
        End If

        If Len(MyNumber) > 3 Then
            MyNumber = Left(MyNumber, Len(MyNumber) - 3)
        Else
            MyNumber = ""
        End If

        Count = Count + 1

    Loop

    SpellNumber = Application.WorksheetFunction.Trim(SpellNumber) & " Only"

End Function

Private Function GetHundreds(ByVal MyNumber)

    Dim Result

    If Val(MyNumber) = 0 Then Exit Function

    MyNumber = Right("000" & MyNumber, 3)

    If Mid(MyNumber, 1, 1) <> "0" Then
        Result = GetDigit(Mid(MyNumber, 1, 1)) & " Hundred "
    End If

    If Mid(MyNumber, 2, 1) <> "0" Then
        Result = Result & GetTens(Mid(MyNumber, 2))
    Else
        Result = Result & GetDigit(Mid(MyNumber, 3))
    End If

    GetHundreds = Result

End Function

Private Function GetTens(TensText)

    Dim Result

    Result = ""

    If Val(Left(TensText, 1)) = 1 Then

        Select Case Val(TensText)
            Case 10: Result = "Ten"
            Case 11: Result = "Eleven"
            Case 12: Result = "Twelve"
            Case 13: Result = "Thirteen"
            Case 14: Result = "Fourteen"
            Case 15: Result = "Fifteen"
            Case 16: Result = "Sixteen"
            Case 17: Result = "Seventeen"
            Case 18: Result = "Eighteen"
            Case 19: Result = "Nineteen"
        End Select

    Else

        Select Case Val(Left(TensText, 1))
            Case 2: Result = "Twenty "
            Case 3: Result = "Thirty "
            Case 4: Result = "Forty "
            Case 5: Result = "Fifty "
            Case 6: Result = "Sixty "
            Case 7: Result = "Seventy "
            Case 8: Result = "Eighty "
            Case 9: Result = "Ninety "
        End Select

        Result = Result & GetDigit(Right(TensText, 1))

    End If

    GetTens = Result

End Function

Private Function GetDigit(Digit)

    Select Case Val(Digit)
        Case 1: GetDigit = "One"
        Case 2: GetDigit = "Two"
        Case 3: GetDigit = "Three"
        Case 4: GetDigit = "Four"
        Case 5: GetDigit = "Five"
        Case 6: GetDigit = "Six"
        Case 7: GetDigit = "Seven"
        Case 8: GetDigit = "Eight"
        Case 9: GetDigit = "Nine"
        Case Else: GetDigit = ""
    End Select

End Function
Step 6
Save the workbook as an Excel Macro-Enabled Workbook (.xlsm).
Step 7
Insert a button using Shapes.
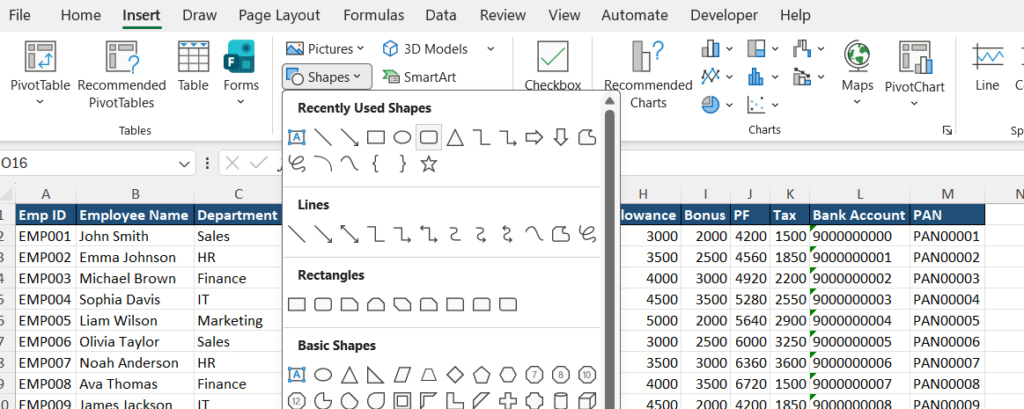
Rename it:
Create Salary Slips
Step 8
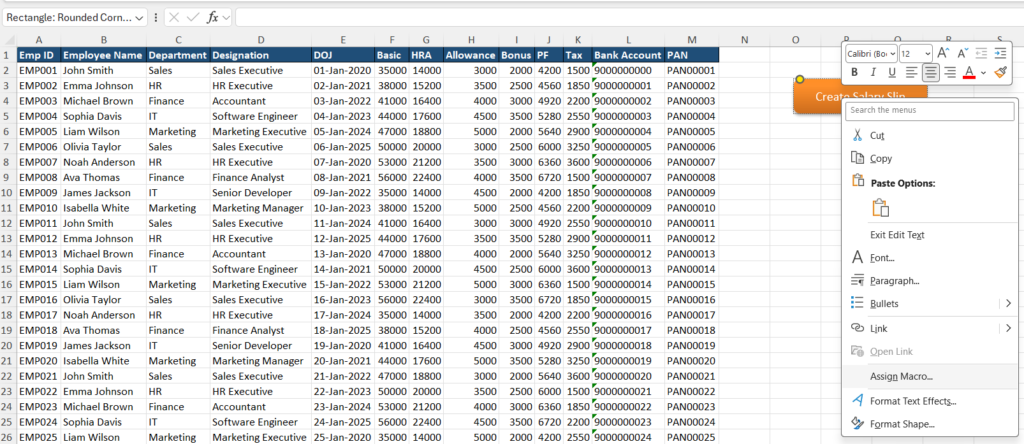
Assign the VBA macro to the button.
That’s it.
Now click the button.
Excel automatically starts generating salary slip PDFs for every employee.
Within a few seconds, all salary slips are ready.
Features of This Salary Slip Generator
This Excel automation includes several practical features that make monthly payroll work much easier.
✔ Generate unlimited salary slips
✔ Automatic PDF export
✔ One-click automation
✔ Easy-to-edit salary slip template
✔ Dynamic employee data
✔ No manual work
✔ Beginner-friendly VBA code
✔ Saves PDFs automatically
✔ Reusable every month
✔ Suitable for HR teams, accountants, payroll executives, and small businesses
Who Can Use This Salary Slip Generator?
This project is useful for anyone who prepares salary slips regularly.
It is especially helpful for:
- HR Professionals
- Payroll Executives
- Accounts Departments
- Small Businesses
- Manufacturing Companies
- Schools
- Hospitals
- Consultants
- Chartered Accountants
- Freelancers managing payroll
Whether your organization has 20 employees or 2,000 employees, this automation can save a significant amount of time every month.
Can You Customize It?
Absolutely.
You can easily customize the salary slip according to your company requirements.
For example, you can add:
- Company Logo
- Digital Signature
- QR Code
- Bank Details
- Leave Balance
- Attendance Summary
- Overtime
- Incentives
- Bonus
- Tax Details
- Company Branding
The VBA logic remains the same.
Only the template changes.
Tips Before Running the Macro
Before generating salary slips, make sure:
- Your employee master data is complete.
- The salary slip template is linked correctly.
- The workbook is saved as .xlsm.
- Macros are enabled in Excel.
- The output folder has write permission.
Following these simple checks helps ensure that the automation runs smoothly every time.
Final Thoughts
Creating salary slips manually every month is repetitive and time-consuming.
A simple Salary Slip Generator built with Excel VBA can automate the entire process and reduce hours of work to just a few seconds.
Whether you’re an HR executive, payroll professional, or Excel enthusiast, this project is a great example of how VBA can transform everyday tasks into one-click automation.
If you enjoy building Excel automation projects like this, stay connected because I’ll be sharing many more real-world VBA solutions, dashboards, and productivity tools designed to save time and simplify your work.
Happy Automating!
Frequently Asked Questions (FAQ)
Is this Salary Slip Generator free?
Yes. You can build your own version using Excel and VBA.
Does it generate PDF salary slips automatically?
Yes. The macro exports each employee’s salary slip as an individual PDF.
Can I change the salary slip design?
Yes. You can fully customize the template without changing the overall automation process.
Do I need advanced VBA knowledge?
No. If you’re familiar with basic Excel, you can easily implement the VBA code by following the steps in this tutorial.
Does it work with Microsoft Excel 365?
Yes. It works with Excel versions that support VBA, including Microsoft Excel 365, Excel 2021, Excel 2019, and earlier desktop versions with macro support.


