
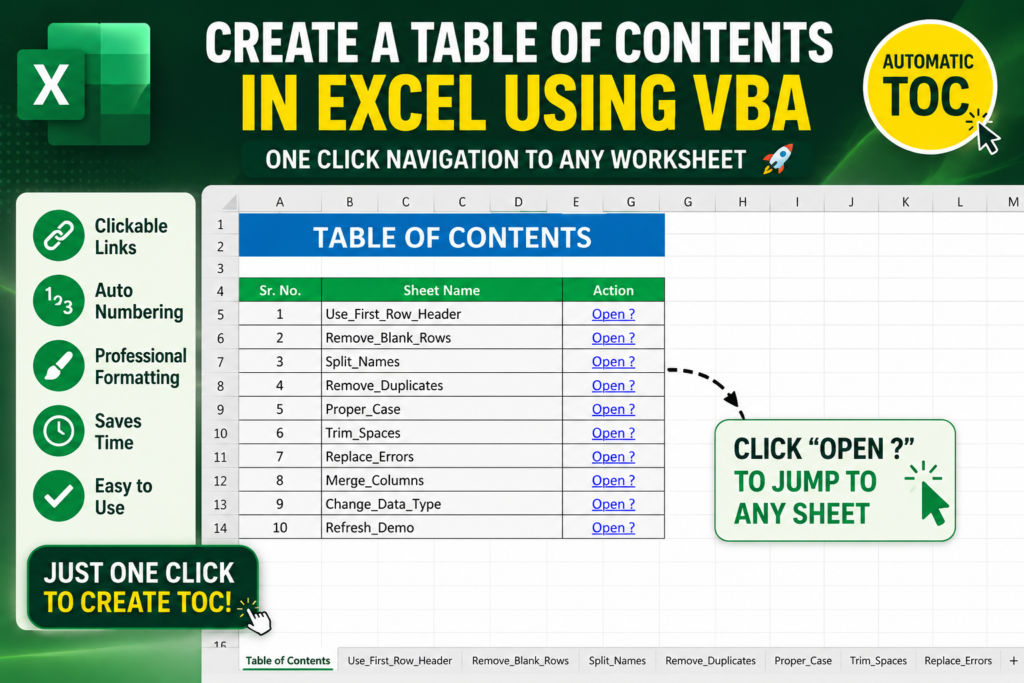
Table of Contents: Imagine opening an Excel workbook with 10, 20, or even 50 worksheets. Instead of scrolling through endless sheet tabs trying to find the correct worksheet, what if you could click a single button and instantly generate a professional Table of Contents page with direct links to every sheet?
That’s exactly what we’ll build in this tutorial.
In this guide, you’ll learn how to create an automated Table of Contents (TOC) in Excel using VBA. The solution is perfect for Power Query projects, dashboards, reports, training workbooks, inventory systems, and any Excel file containing multiple worksheets.
What You’ll Learn:
- Create a professional TOC sheet automatically
- Add clickable links to every worksheet
- Improve workbook navigation
- Use VBA to automate repetitive tasks
- Create a more professional Excel project
The Problem Every Excel User Faces
Let’s say you’ve created a Power Query project containing:
- Use First Row Header
- Remove Blank Rows
- Split Names
- Remove Duplicates
- Proper Case
- Trim Spaces
- Replace Errors
- Merge Columns
- Change Data Type
- Refresh Demo
Initially, switching between sheets isn’t a problem. However, as your workbook grows, finding the right worksheet becomes frustrating.
This is where a Table of Contents becomes incredibly useful.
Real-World Scenario:
Imagine sending your workbook to a manager or client. Instead of asking them to search through multiple tabs, they can simply open the TOC sheet and click the desired worksheet.
What We Are Building
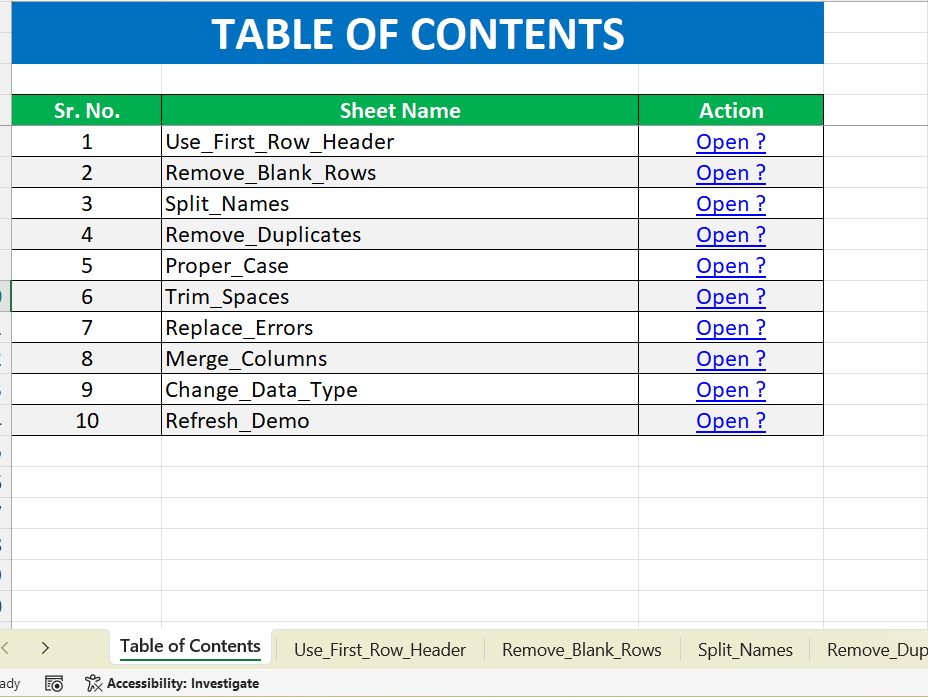
Your workbook will contain a simple button called TOC.
When the button is clicked, Excel automatically generates a professional Table of Contents page.
The output will look similar to this:
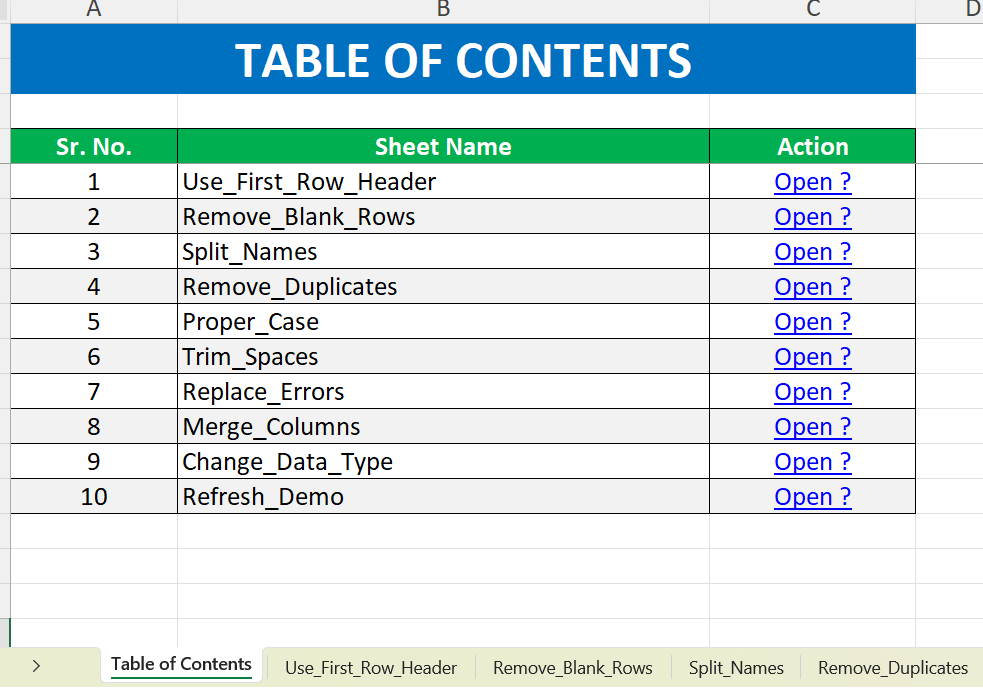
Each Open → link is clickable and instantly takes the user to the selected worksheet.
Workbook Setup Used in This Example
Before running the VBA code, the workbook contains multiple Power Query practice sheets.
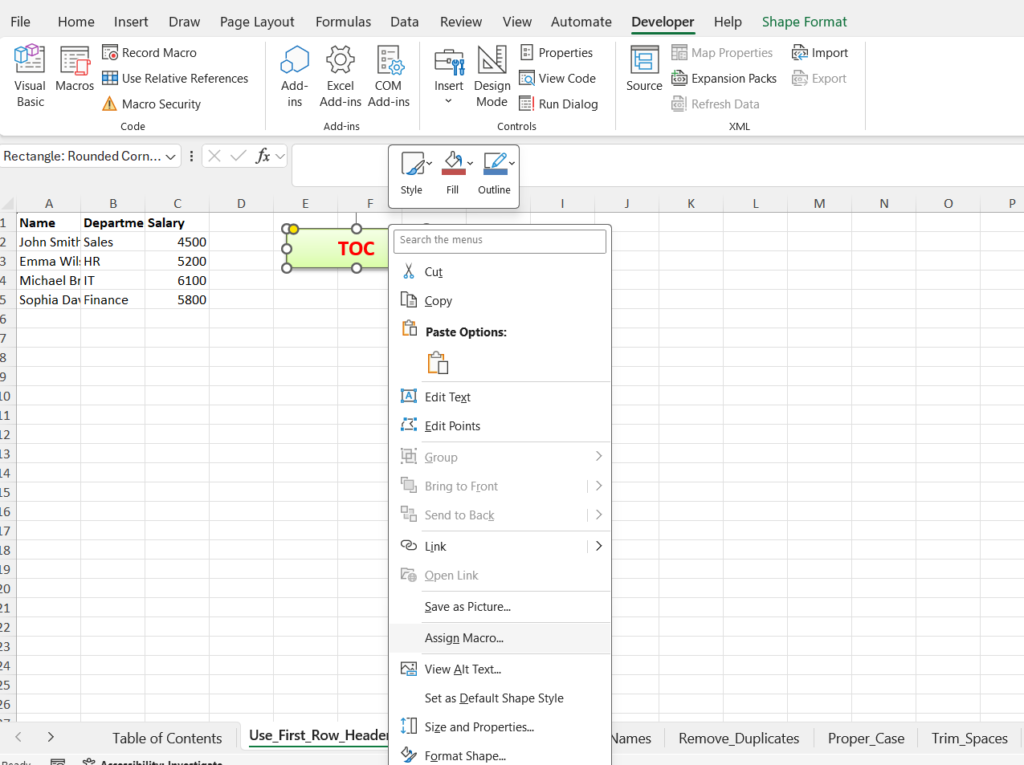
You manually created a button shape labeled TOC on your worksheet.
The setup process is very simple.
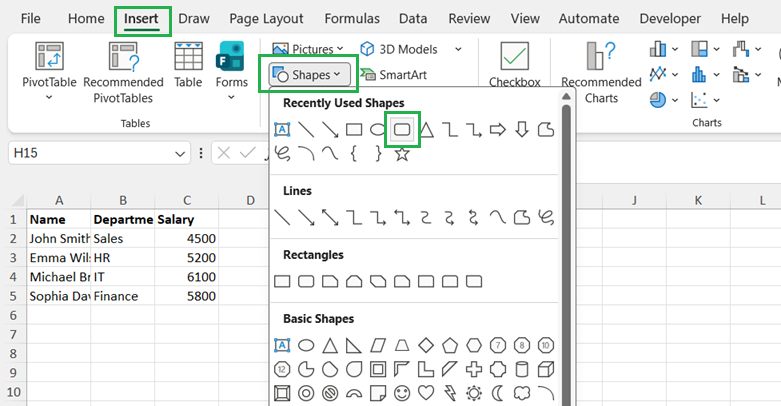
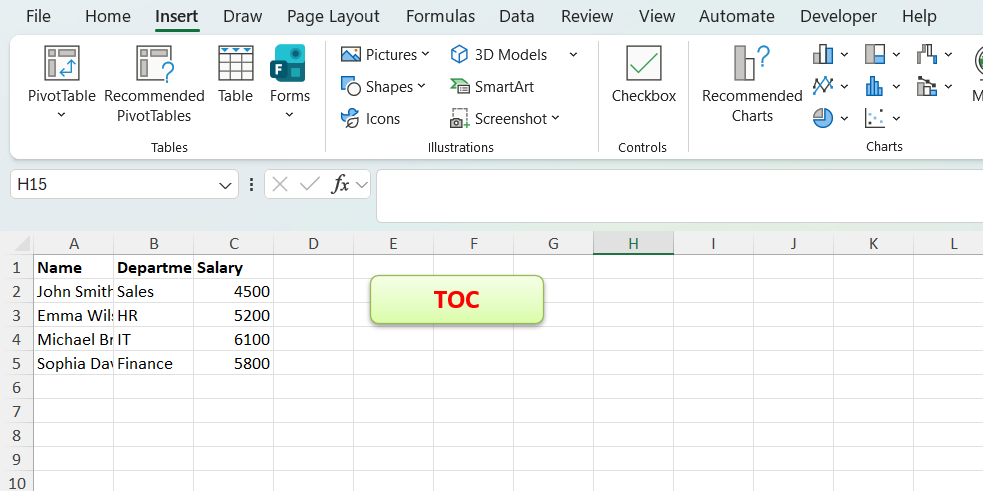
Step 1: Add a TOC Button
Go to:
Insert → Shapes
Select a rounded rectangle and place it anywhere on your worksheet.
Rename the shape to:
TOC
Step 2: Open VBA Editor
Press:
ALT + F11
This opens the Visual Basic Editor.
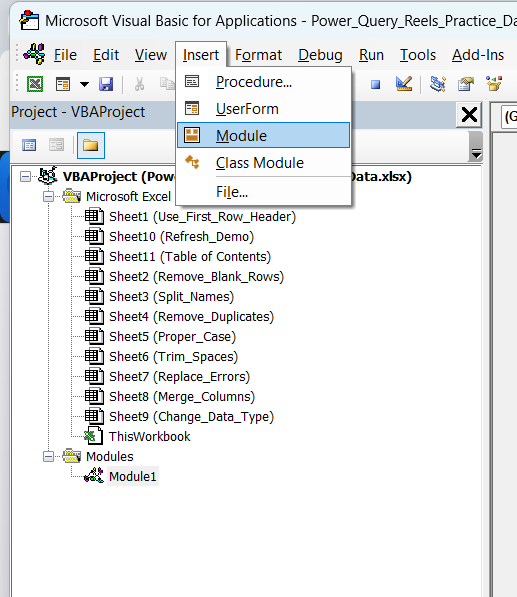
Step 3: Insert a Module
Navigate to:
Insert → Module
A blank code window will appear.
Step 4: Paste the VBA Code
Copy and paste the Table of Contents VBA code into the module.
Sub CreateProfessionalTOC()

    Dim ws As Worksheet
    Dim TOC As Worksheet
    Dim LastRow As Long
    Dim i As Long

    Application.ScreenUpdating = False

    'Delete old TOC if exists
    On Error Resume Next
    Application.DisplayAlerts = False
    Worksheets("Table of Contents").Delete
    Application.DisplayAlerts = True
    On Error GoTo 0

    'Create TOC Sheet
    Set TOC = Worksheets.Add(Before:=Worksheets(1))
    TOC.Name = "Table of Contents"

    'Title
    With TOC.Range("A1:C2")
        .Merge
        .Value = "TABLE OF CONTENTS"
        .HorizontalAlignment = xlCenter
        .VerticalAlignment = xlCenter
        .Font.Size = 22
        .Font.Bold = True
        .Font.Color = RGB(255, 255, 255)
        .Interior.Color = RGB(0, 112, 192)
    End With

    'Headers
    TOC.Range("A4").Value = "Sr. No."
    TOC.Range("B4").Value = "Sheet Name"
    TOC.Range("C4").Value = "Action"

    With TOC.Range("A4:C4")
        .Font.Bold = True
        .Font.Color = RGB(255, 255, 255)
        .Interior.Color = RGB(0, 176, 80)
        .HorizontalAlignment = xlCenter
    End With

    i = 5

    'Populate TOC
    For Each ws In ThisWorkbook.Worksheets

        If ws.Name <> "Table of Contents" Then

            TOC.Cells(i, 1).Value = i - 4
            TOC.Cells(i, 2).Value = ws.Name

            TOC.Hyperlinks.Add _
                Anchor:=TOC.Cells(i, 3), _
                Address:="", _
                SubAddress:="'" & ws.Name & "'!A1", _
                TextToDisplay:="Open ?"

            i = i + 1

        End If

    Next ws

    LastRow = i - 1

    'Format Table
    With TOC.Range("A4:C" & LastRow)
        .Borders.LineStyle = xlContinuous
    End With

    'Alternate Row Colors
    For i = 5 To LastRow

        If i Mod 2 = 0 Then
            TOC.Range("A" & i & ":C" & i).Interior.Color = RGB(242, 242, 242)
        End If

    Next i

    'Center Columns A & C
    TOC.Columns("A").HorizontalAlignment = xlCenter
    TOC.Columns("C").HorizontalAlignment = xlCenter

    'Column Widths
    TOC.Columns("A").ColumnWidth = 12
    TOC.Columns("B").ColumnWidth = 40
    TOC.Columns("C").ColumnWidth = 15

    'Freeze Header
    TOC.Activate
    TOC.Range("A5").Select
    ActiveWindow.FreezePanes = True

    MsgBox "Professional Table of Contents Created Successfully!", vbInformation

    Application.ScreenUpdating = True

End Sub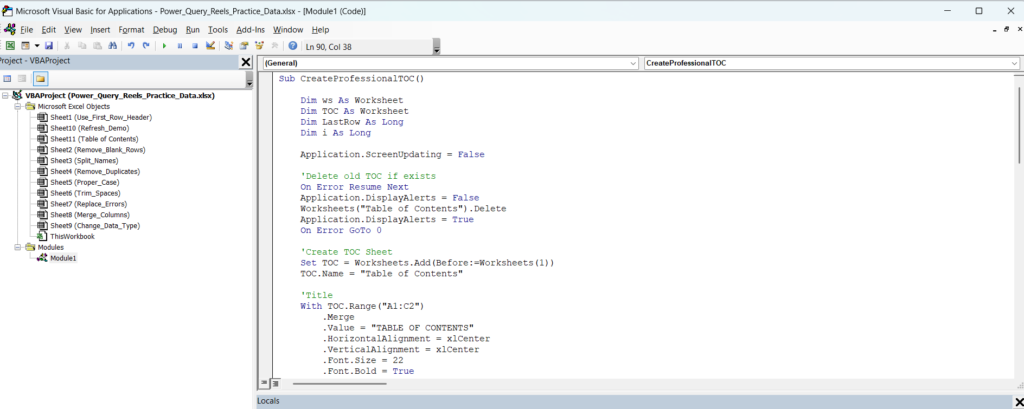
Step 5: Save the Workbook
Save the workbook as:
Excel Macro-Enabled Workbook (*.xlsm)
This is important because standard XLSX files cannot store VBA macros.
Step 6: Assign the Macro to the Button
Right-click the TOC button.
Select:
Assign Macro
Choose:
CreateProfessionalTOC
Click OK.
Step 7: Generate the TOC
Now simply click the TOC button.
Excel automatically:
- Creates a new Table of Contents sheet
- Lists all worksheets
- Generates clickable links
- Applies professional formatting
- Numbers each worksheet automatically
Why This VBA Solution Is So Useful
1. Saves Time
No need to manually create navigation links.
2. Improves User Experience
Users can jump to any worksheet instantly.
3. Looks Professional
The workbook appears more organized and user-friendly.
4. Perfect for Training Files
If you’re creating Excel tutorials or Power Query lessons, students can navigate through topics easily.
5. Great for Client Projects
Clients appreciate workbooks that are easy to understand and navigate.
Color Psychology Behind the Design
The TOC design uses colors strategically to improve usability and professionalism.
| Color | Meaning |
|---|---|
| Blue | Trust, professionalism, reliability |
| Green | Action, success, navigation |
| White | Clean layout and readability |
| Light Gray | Reduced visual fatigue |
This combination creates a modern and user-friendly interface.
Best Use Cases
- Power Query Projects
- Excel Dashboards
- Inventory Management Systems
- HR Reporting Files
- Financial Models
- Training Workbooks
- Sales Reports
- Automation Projects
Common Mistakes to Avoid
Not Saving as XLSM
Always save your workbook as a macro-enabled file.
Not Assigning the Macro
If the button does nothing when clicked, verify that the macro has been assigned correctly.
Disabling Macros
Macros must be enabled when opening the workbook.
Advanced Ideas for Future Improvements
- Add a search box
- Create category-wise navigation
- Add worksheet icons
- Add a “Back to TOC” button on every sheet
- Create automatic TOC refresh
- Display worksheet descriptions
- Show worksheet last modified dates
Pro Tip:
If you frequently create Excel projects with multiple worksheets, save this VBA macro in your Personal Macro Workbook. You’ll be able to generate a professional Table of Contents for any workbook with a single click.
Final Thoughts
A professional Table of Contents is one of the simplest yet most powerful improvements you can make to an Excel workbook.
With just one button click, users can instantly access any worksheet, making your files easier to navigate, easier to share, and far more professional.
Whether you’re building Power Query solutions, dashboards, reports, or training workbooks, this VBA-powered TOC will save time and dramatically improve the user experience.
Frequently Asked Questions
Does this work in Excel 365?
Yes, the VBA code works perfectly in Excel 365 and most desktop versions of Excel.
Can I customize the colors?
Absolutely. You can modify the RGB values in the VBA code to match your company branding.
Will new worksheets automatically appear?
No. Simply click the TOC button again to rebuild the Table of Contents.
Can I use this in client projects?
Yes. This is one of the best VBA automation techniques for professional client-facing workbooks.
Do I need coding experience?
No. Simply copy the VBA code, paste it into a module, and assign it to a button.


Pingback: PowerPoint VBA Trick: Create a Table of Contents Automatically in Seconds-2026 - Excel AI Tools and SEO Guides
Pingback: Salary Slip Generator in Excel VBA – Generate Hundreds of Salary Slips in PDF with One Click-2026 - Excel AI Tools and SEO Guides