
Tired of Sending the Same Email Again and Again?
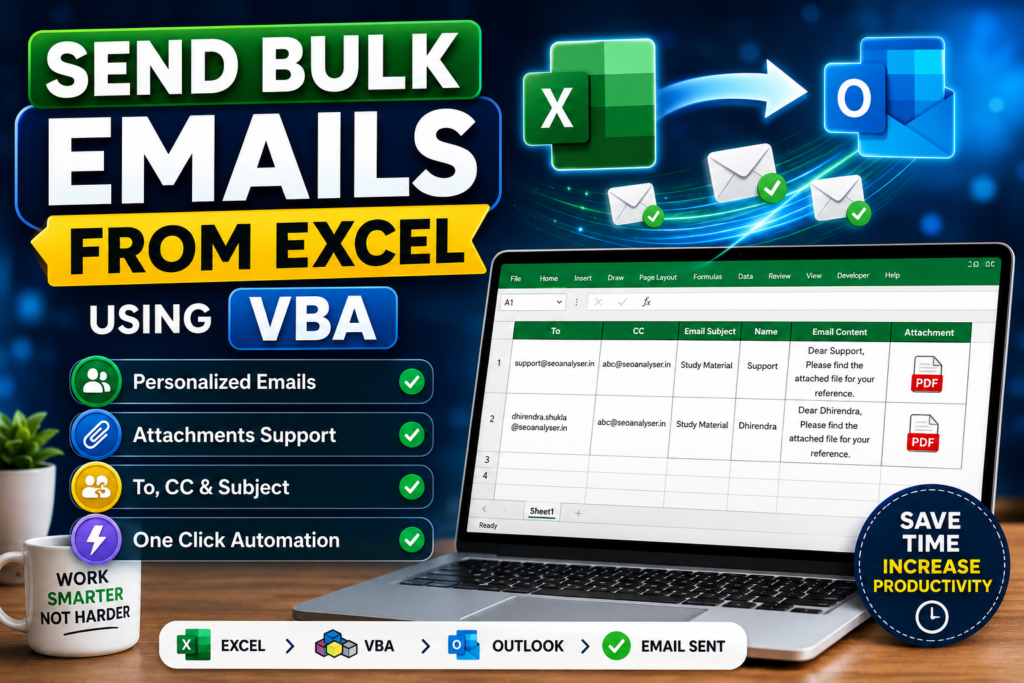
Send Bulk Personalized Emails:- Imagine you have hundreds of customers, students, employees, or clients waiting for the same document. Manually composing each email, attaching the file, typing the recipient’s name, and clicking Send repeatedly can take hours.
What if Excel could do all of that automatically?
With a simple VBA macro, you can send personalized emails directly from Excel through Microsoft Outlook. Each recipient can receive a customized subject line, a personalized message, and even a different attachment—all with a single click.
Whether you’re sending invoices, study materials, certificates, reports, or marketing documents, this automation can save an incredible amount of time while reducing human error.
In this guide, you’ll learn exactly how to create a powerful bulk email system using Excel VBA.
Why Use Excel for Bulk Emails?
Excel is one of the most widely used business tools, and many organizations already maintain customer or employee information in spreadsheets. Instead of copying and pasting details into Outlook, VBA can automate the entire process.
Some common use cases include:
- Sending study materials to students
- Emailing invoices to customers
- Sharing reports with clients
- Distributing certificates
- Sending salary slips
- Delivering project updates
- Sending personalized newsletters
- Sharing PDFs and Excel files with multiple recipients
What You’ll Need
Before getting started, make sure you have:
- Microsoft Excel
- Microsoft Outlook installed
- Outlook configured with your email account
- Macros enabled in Excel
- A list of recipients prepared in Excel
Create Your Email List
Prepare your worksheet with the following columns:
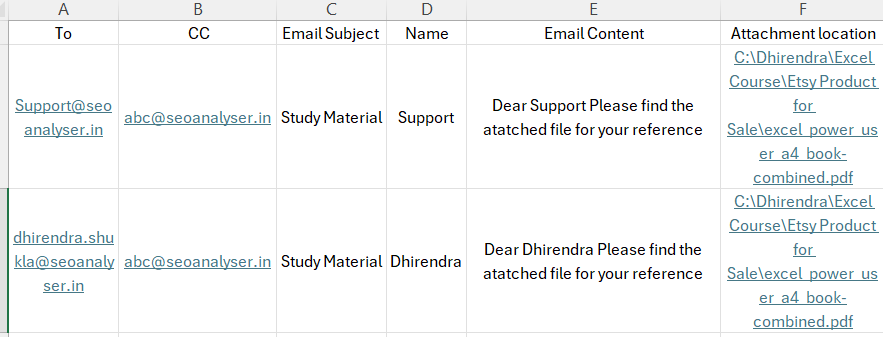
| Column | Purpose |
|---|---|
| To | Recipient email address |
| CC | Carbon copy recipient |
| Subject | Email subject |
| Name | Recipient name |
| Email Content | Personalized message |
| Attachment | Full file path of the attachment |
Each row represents one email.
For example:
- Recipient email
- CC email
- Study Material
- Dhirendra
- Dear Dhirendra, Please find the attached file for your reference.
- C:\Documents\StudyMaterial.pdf
This structure allows the VBA code to read every row and generate personalized emails automatically.
How the VBA Automation Works
The macro performs the following tasks:
- Reads every row in your Excel sheet.
- Opens Microsoft Outlook in the background.
- Creates a new email.
- Adds the recipient’s email address.
- Adds CC recipients if available.
- Inserts the email subject.
- Inserts the personalized message.
- Attaches the specified file.
- Sends the email automatically.
- Repeats the process for every recipient.
Once started, Excel handles the entire workflow without requiring manual intervention.
Key Features
This automation includes several useful features:
- Send unlimited emails from Excel
- Personalized email messages
- Dynamic subject lines
- Automatic attachment support
- Multiple recipients
- CC support
- One-click execution
- Time-saving automation
- Reduced manual errors
- Suitable for businesses, teachers, HR teams, and freelancers
Step-by-Step Setup
Step 1: Open the VBA Editor
Press:
ALT + F11
This opens the Visual Basic Editor.
Step 2: Insert a Module
Go to:
Insert → Module
Paste your VBA code into the new module.
Option Explicit

Sub SendBulkEmails()

    Dim OutApp As Object
    Dim OutMail As Object
    Dim ws As Worksheet
    Dim LastRow As Long
    Dim i As Long
    Dim AttachFile As String

    Set ws = Sheets("Sheet1")

    LastRow = ws.Cells(ws.Rows.Count, "A").End(xlUp).Row

    Set OutApp = CreateObject("Outlook.Application")

    For i = 2 To LastRow

        On Error GoTo EmailError

        If ws.Cells(i, 1).Value <> "" Then

            Set OutMail = OutApp.CreateItem(0)

            AttachFile = ws.Cells(i, 6).Value

            With OutMail

                .To = ws.Cells(i, 1).Value
                .CC = ws.Cells(i, 2).Value
                .Subject = ws.Cells(i, 3).Value
                .Body = ws.Cells(i, 5).Value

                If AttachFile <> "" Then

                    If Dir(AttachFile) <> "" Then
                        .Attachments.Add AttachFile
                    Else
                        ws.Cells(i, 7).Value = "Attachment Missing"
                        GoTo NextEmail
                    End If

                End If

                .Send

            End With

            ws.Cells(i, 7).Value = "Sent"

        End If

NextEmail:
        Set OutMail = Nothing
        On Error GoTo 0

ContinueLoop:
    Next i

    MsgBox "Process Completed"

    Exit Sub

EmailError:

    ws.Cells(i, 7).Value = Err.Description
    Resume ContinueLoop

End Sub
Step 3: Save the Workbook
Save your workbook as:
Excel Macro-Enabled Workbook (.xlsm)
Without this format, your VBA code won’t be saved.
Step 4: Enable Macros
When reopening the workbook, click:
Enable Content
This allows Excel to run your automation.
Step 5: Run the Macro
Press:
ALT + F8
Select the macro.
Click Run.
Excel will automatically send emails one by one through Outlook.
Personalize Every Email
One of the biggest advantages of VBA automation is personalization.
Instead of sending a generic message like:
“Please find the attached file.”
You can send:
“Dear Dhirendra,
Please find your study material attached.
Thank you.”
Every recipient receives a customized email, making the communication feel more professional and personal.
Attach Different Files
Your Excel sheet can specify a different attachment for every recipient.
For example:
Student A receives:
Certificate_A.pdf
Student B receives:
Certificate_B.pdf
Student C receives:
Certificate_C.pdf
This makes the solution perfect for certificates, invoices, reports, and personalized documents.
Common Mistakes to Avoid
Incorrect File Path
Always provide the complete file path.
Correct:
C:\Documents\Invoice.pdf
Incorrect:
C:\Documents
Outlook cannot attach folders.
Invalid Email Addresses
Verify every email address before running the macro.
Incorrect addresses may cause Outlook to generate errors.
Outlook Not Configured
Your Outlook account must already be signed in.
If Outlook isn’t configured, Excel won’t be able to send emails.
Macros Disabled
If macros are disabled, your VBA code will never execute.
Always enable macros before running the workbook.
Benefits of Automating Emails
Organizations that automate repetitive email tasks often experience significant productivity improvements.
Benefits include:
- Save hours every week
- Eliminate repetitive work
- Reduce typing mistakes
- Maintain consistent formatting
- Send emails faster
- Improve professionalism
- Personalize communication at scale
- Increase productivity
Best Practices
To achieve the best results:
- Test the macro with a few recipients before sending hundreds of emails.
- Verify attachment paths.
- Double-check recipient addresses.
- Use meaningful subject lines.
- Keep your email concise and professional.
- Avoid sending extremely large batches at once.
- Keep Outlook open while the macro runs.
- Create a backup of your Excel file before running the automation.
Trending Dashboard
Frequently Asked Questions
Can I send emails without Outlook?
No. This VBA solution uses Microsoft Outlook to send emails.
Can I send PDF files?
Yes.
You can attach PDFs, Word documents, Excel files, ZIP files, images, and many other file types.
Can every recipient receive a different attachment?
Absolutely.
Each row in Excel can reference a different file.
Can I personalize the email?
Yes.
You can customize the subject, greeting, message body, and attachments for every recipient.
Is there a limit?
The VBA code itself has no limit, but your email provider may restrict the number of emails you can send within a certain period.
Final Thoughts
Excel VBA is one of the easiest ways to automate repetitive email tasks. Instead of manually creating hundreds of emails, you can prepare your data once and let Excel do the work.
Whether you’re a teacher distributing study materials, an HR professional sending documents, a freelancer sharing reports, or a business owner communicating with customers, this solution can dramatically reduce manual effort while improving accuracy and consistency.
Once you’ve built your first bulk email automation, you’ll wonder how you ever managed without it.
If you’re looking to become more productive with Excel, learning VBA automation is one of the best investments you can make.

